

How to activate geofencing?
Make sure to create presence automations (Zigbee) or assign away instructions (Wi-Fi and Mi-Wi) to your devices so that the geofencing feature triggers actions.
To activate the geofencing functionality and allow the triggering of instructions according to your distance from a location, you must:
- From the Dashboard or main menu, tap Geofencing.
- A pop-up window will appear, asking you to share your location to activate the geofencing feature then tap Settings.
- In your device settings, tap Locations and select Always.
For the geofencing feature to work properly, you must share your location with Neviweb at all times. - Return to the Neviweb app, then select Geofencing again from the home screen or the main menu. Tap Modify Parameters to determine the location and radius settings.
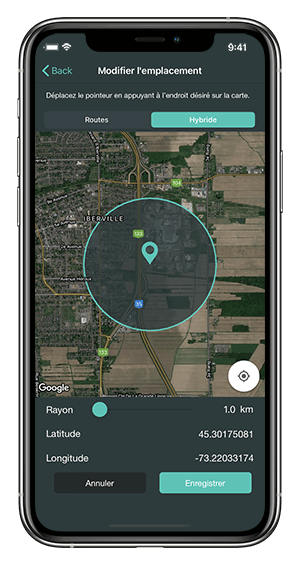
- Tap the map with one finger to mark your location, then use the cursor below the map to select the radius. Tap Save.
Make sure that the indicated device used corresponds to the one whose location will be geofenced. By default, Neviweb selects the first mobile device that has activated geofencing. To change the device, tap Change device with the smartphone or tablet that will be used for geofencing.
Note: It is now possible to link more than one mobile device to the geofencing feature by adding sub-users to the account (maximum of 4 sub-users).
You will find below the most common issues you may encounter.
If you still need help, contact Sinopé technical support.
Does Sinopé collect data about my location when I use geofencing?
What happens if a time automation conflicts with a presence automation?
Can I put a location in Away or Present mode without activating the sharing of my location?
I cannot see the geofencing functionality on the Neviweb.com website. What to do?
What is the difference between geofencing and geolocation?