

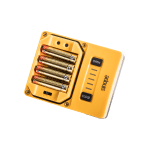
Bouton « OPEN »
Bouton « CLOSE »
Bouton A : Sélectionner le réseau Bouton B : Jumeler les appareils compatibles avec la valve
Commutateur de sélection


Smart water valve
VA4220ZB / VA4221ZB
Smart water valve
VA4220WF / VA4221WF
Follow the next steps to connect your smart water valve to your GT130 gateway or a compatible Zigbee system.
lnitiate the connectivity session by pressing the RF signal button on the GT130 gateway. The indicator light will start flashing.
Compatible Zigbee gateway: refer to the installation guide for the latter.
Remove the valve cover by unscrewing the 4 screws with a flat screwdriver.
Connect the valve to an electrical outlet, using the supplied adapter, near where it will be installed. By doing so, you will validate the range of the Wi-Fi communication between the valve and your network.
Although each unit is pre-tested at the factory, it is strongly recommended that you test the valve before installation to ensure proper operation in your home.
Press the « A » button to associate the valve with the Zigbee network.
| Valve light | Status |
| Green light blinks | Device is connecting |
| 3 green lights lit for 5 s | Successful connection |
| Red indicator light ON for 5 s | Connection has failed* |
*Refer to the Troubleshooting section of our Website
The Zigbee valve (VA4220ZB / VA4221ZB) can also act as a secondary valve to the main valve (VA4220WF / VA4221WF) to shut off a second water inlet when leaks are detected.
Once the secondary valve has been added to the main valve, the two valves will always have the same status (OPEN / CLOSE), regardless of whether the command comes from the main or secondary valve.
Remove the valve covers by unscrewing the 4 screws with a flat screwdriver.
Connect both valves to a power outlet, using the supplied adapters, near the location where they will be installed. By doing so, you will validate the range of communication between the two valves.
Press the « B » button on the main valve (VA4220WF/VA4221WF) to open the network connectivity session. The indicator lights will light up in sequence to indicate that the session is active.
| Valve light | Status |
| Green light blinks | Device is connecting |
| 3 green lights lit for 5 s | Successful connection |
| Red indicator light ON for 5 s | Connection has failed* |
*Refer to the Troubleshooting section of our Website
Press the « A » button on the secondary valve (VA4220ZB/VA4221ZB) to connect to the main valve.
Once the connection is established, press the « B » button on the main valve to close the connectivity session.
The connection between the 2 valves can be verified by closing the main valve. The secondary valve will then close automatically.
Your smart water valve integrates seamlessly with the Neviweb home automation platform as well as popular voice assistants. See how adding it is a snap.
You will find below the most common issues you may encounter.
If you still need help, contact Sinopé technical support.
Ce site est offert dans d'autre langue. Veuillez choisir votre préférence.