Menu
- Home
- Water damage protection
- MC3100ZB
- Install your smart multi-controller MC3100ZB

Proceed as follows to install your multi-controller

Proceed as follows to install your multi-controller

The multi-controller can be used to control several types of devices, including:
Here is a detailed step-by-step guide that will take you through the connection of your smart multi-controller with the GT130 gateway.
Start the connectivity session by pressing the RF button on the GT130 gateway. The indicator light will start to blink.

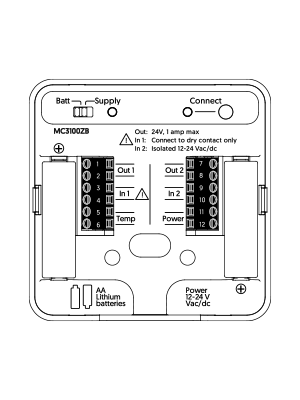
Remove the controller’s cover and connect the power supply and/or insert batteries.
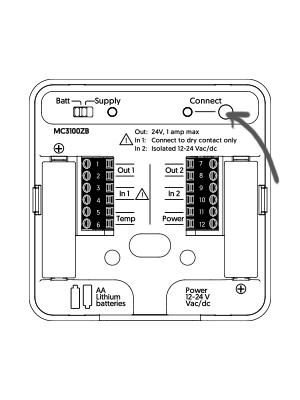
Press the « Connect » button on the multi-controller.
| Light | Status |
| Green light blinks | Device is connecting |
| Green light lit for 10 s | Successful connection |
| Red light lit for 10 s | Connection has failed* |
*Refer to the « support » section of our website at www.sinopetech.com.

When all your devices are connected, close the connectivity session of your GT130 gateway.
Here is a detailed step-by-step guide that will take you through the connection of your smart multi-controller with the Sinopé smart water valve.
Note that there are no wires connecting the multi-controller to the valve.
To see the detailed installation steps of the multi-controller with the smart water valve and the alarm panel, click here.
The mode switch of the valve must be in position « 1 ». The valve must be plugged into a power outlet.
Press the « B » button to open the network connectivity session. The indicator lights will light up in sequence to indicate that the session is active.
Remove the controller’s cover and connect the power supply and/or insert batteries.


Press the « Connect » button on the multi-controller.
| Light | Status |
| Green light blinks | Device is connecting |
| Green light lit for 10 s | Successful connection |
| Red light lit for 10 s | Connection has failed* |
*Refer to the « Support » section of our Website at www.sinopetech.com. To consult a wiring diagram, visit support@sinopetech.com.
Once the controller is connected, press the « B » button on the valve to close the connectivity session.
*Only compatible with the Wi-Fi Sedna valves, including the VA4220WF, the VA4221WF, the VA4220WF-M and the VA4221WF-M.
You will find below the most common issues you may encounter.
If you still need help, contact Sinopé technical support.
Ce site est offert dans d'autre langue. Veuillez choisir votre préférence.